The complete source code for this project is available at GitHub: PeerPlot
What is PeerPlot?
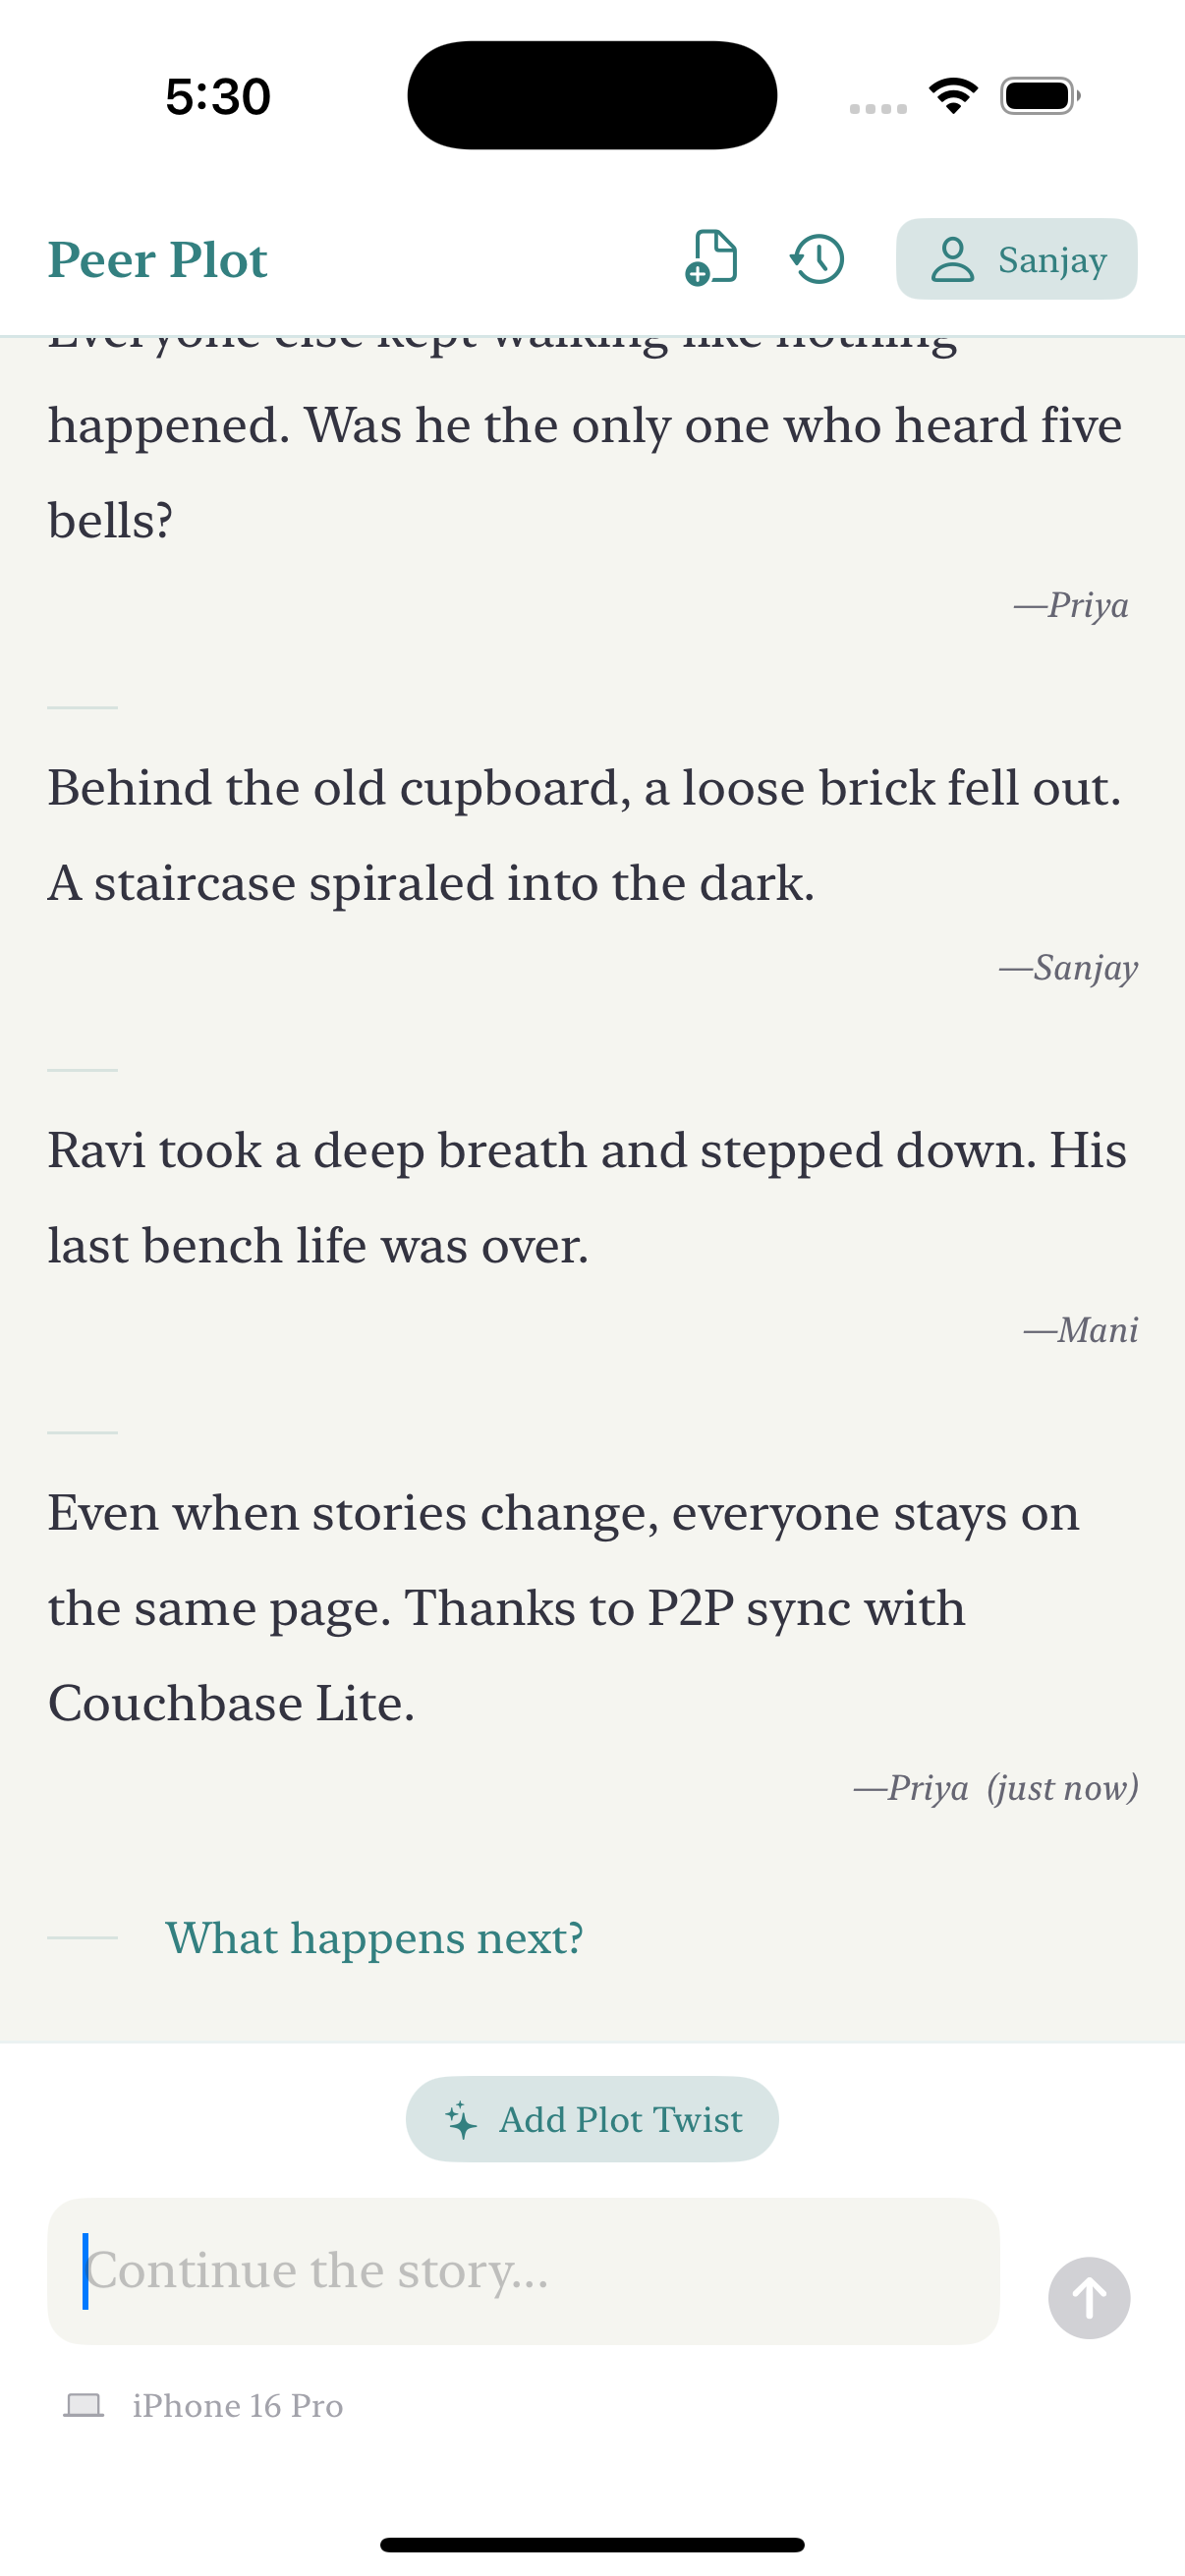
PeerPlot is a collaborative storytelling app where multiple users can contribute to the same story, even without an internet connection. When devices are near each other, they automatically discover and sync their stories.
The key features include:
- Creating and adding to collaborative stories
- Peer-to-peer syncing without internet
- Archiving completed stories
- Adding random “twists” to spur creativity (In future you can integrate this with AI)
System Architecture Overview
Before diving into the code, let’s understand the system architecture:
- UI Layer: SwiftUI views and view models handling user interactions
- Data Layer: DatabaseManager for local storage using Couchbase Lite
- Sync Layer: AppService handling peer discovery and synchronization
- Security Layer: Credentials for secure P2P communication
The Tech Stack
I chose this technology stack:
- SwiftUI for the UI and uses the latest @Observable macro.
- Couchbase Lite for the local database and sync functionality
- Network framework for peer discovery and connections
Getting Started with Couchbase Lite
This demo app was built with help from the following resources:
- Simple Sync - A demonstration app showing how to read, write, search, and sync data using Couchbase Lite
- Couchbase P2P Sync Solutions - Official documentation on peer-to-peer sync capabilities
- Couchbase P2P Sync Demo - Video demonstration of peer-to-peer synchronization
You can download the Couchbase Lite framework using the direct binary download as that worked for me
Rookie mistake #1: I initially used the Community Edition (
couchbase-lite-ios) installed using SPM but this demo requires Couchbase Lite framewokr from the Enterprise edition.
Database Setup
The heart of the app is the DatabaseManager class that handles all database operations. Here’s a simplified version showing its core structure:
class DatabaseManager {
    // Singleton instance
    static let shared = DatabaseManager()

    // Database instance
    private var database: Database

    // Collection
    private var collection: Collection

    // App instance for P2P sync
    private var syncApp: AppService?

    // Publishers
    private let storyEntriesSubject = PassthroughSubject<[StoryEntry], Never>()

    var storyEntriesPublisher: AnyPublisher<[StoryEntry], Never> {
        storyEntriesSubject.eraseToAnyPublisher()
    }

    private init() {
        LogManager.info("Initializing DatabaseManager...", category: .database)

        do {
            // Create or open database
            self.database = try Database(name: "peerplot")

            // Use default collection
            self.collection = try database.defaultCollection()

            // Set up document listeners
            setupListeners()

            // Set up P2P sync
            setupP2PSync()
        } catch {
            fatalError("Failed to initialize database: \(error.localizedDescription)")
        }
    }
}
The DatabaseManager handles several key responsibilities:
- Creating/opening the local database
- Setting up document listeners to react to changes
- Initializing P2P synchronization
- Uses @Observable macro for reatcive updates.
Data Model Design
The app uses two primary models:
- StoryEntry - Represents a single contribution to a collaborative story
struct StoryEntry: Identifiable { let id: String let text: String let author: String let timestamp: Date } - StoryHistoryItem - Represents a completed story saved in history
struct StoryHistoryItem: Identifiable {
    let id: String
    let title: String
    let archivedAt: Date
    let entryCount: Int

    var formattedDate: String {
        let formatter = DateFormatter()
        formatter.dateStyle = .medium
        formatter.timeStyle = .short
        return formatter.string(from: archivedAt)
    }
}
The database structure is straightforward - I store story entries in a single document with a counter to keep track of the entries:
func addStoryEntry(text: String, author: String) -> Bool {
    // Validate input
    guard !text.trimmingCharacters(in: .whitespacesAndNewlines).isEmpty,
          !author.trimmingCharacters(in: .whitespacesAndNewlines).isEmpty else {
        return false
    }

    do {
        let timestamp = Date()
        let entryId = UUID().uuidString

        // Get or create document
        let storyDoc: MutableDocument
        let count: Int

        if let existingDoc = try collection.document(id: "story") {
            storyDoc = existingDoc.toMutable()
            count = Int(storyDoc.int(forKey: "count"))
        } else {
            storyDoc = MutableDocument(id: "story")
            count = 0
        }

        // Add entry data
        storyDoc.setString(id, forKey: "entry_\(count)_id")
        storyDoc.setString(text, forKey: "entry_\(count)_text")
        storyDoc.setString(author, forKey: "entry_\(count)_author")
        storyDoc.setDate(timestamp, forKey: "entry_\(count)_timestamp")

        // Update metadata
        storyDoc.setInt(count + 1, forKey: "count")
        storyDoc.setDate(timestamp, forKey: "updatedAt")

        try collection.save(document: storyDoc)
        return true
    } catch {
        LogManager.error("Error adding story entry: \(error.localizedDescription)", category: .database)
        return false
    }
}
This approach makes it easy to maintain the order of entries and efficiently retrieve the entire story.
Setting Up Peer-to-Peer Sync
The most challenging part was implementing the peer-to-peer sync. This required several components:
- TLS certificates for secure communication
- Network service advertisement and discovery
- Couchbase Lite message endpoints
Rather than building the complex AppService and security components from scratch, I built upon Couchbase’s sample implementations (Simple Sync app), streamlining the development process
Generating Certificates
For secure P2P communication, we need SSL certificates. I created a shell script to generate them:
#!/bin/bash

# Create output directory
mkdir -p credentials

# Generate CA key and certificate
openssl genrsa -out credentials/ca_key.pem 2048
openssl req -new -x509 -days 3650 -key credentials/ca_key.pem -out credentials/ca_cert.pem -subj "/CN=PeerPlot CA"
openssl x509 -outform der -in credentials/ca_cert.pem -out credentials/ca_cert.der

# Generate client key and certificate
openssl genrsa -out credentials/client_key.pem 2048
openssl req -new -key credentials/client_key.pem -out credentials/client.csr -subj "/CN=PeerPlot Client"
openssl x509 -req -days 3650 -in credentials/client.csr -CA credentials/ca_cert.pem -CAkey credentials/ca_key.pem -CAcreateserial -out credentials/client_cert.pem

# Create P12 file from client key and certificate
openssl pkcs12 -export -out credentials/client_identity.p12 -inkey credentials/client_key.pem -in credentials/client_cert.pem -passout pass:
After generating the certificates, you’ll need to add them to your Xcode project and target:
ca_cert.der- The CA certificateclient_identity.p12- The client identity
Rookie mistake #2: I forgot to add the
.p12and.derfiles to my app target, resulting in runtime crashes when the app couldn’t find the certificates.
Peer Discovery with Network Framework
For peer discovery, the app uses Apple’s Network framework, which provides Bonjour-based service discovery and TLS-secured connections. Here’s a key part of the implementation:
The AppService class handles peer discovery, connection management, and integrates with Couchbase Lite for data synchronization. Check the full implementation in the GitHub repository.
Rookie mistake #3: I forgot to add the necessary Bonjour service permissions to Info.plist, causing peer discovery to fail silently. You need both
NSLocalNetworkUsageDescriptionandNSBonjourServicesentries.
Here’s what your Info.plist needs:
<key>NSLocalNetworkUsageDescription</key>
<string>PeerPlot uses the local network to discover and connect to other devices for story synchronization.</string>
<key>NSBonjourServices</key>
<array>
    <string>_peerplot._tcp</string>
</array>
Conflict Resolution
When multiple users share the story, conflicts can occur especially when one user goes offline and shares contriubutes and later comes back online and the story needs to merged correctly without any loss off message. I implemented a conflict resolver that merges changes from both documents:
class DefaultConflictResolver: ConflictResolverProtocol {
    func resolve(conflict: Conflict) -> Document? {
        guard let localDoc = conflict.localDocument,
              let remoteDoc = conflict.remoteDocument else {
            return conflict.remoteDocument ?? conflict.localDocument
        }

        // Create a new merged document
        let mergedDoc = MutableDocument(id: localDoc.id)

        // Get the counts from both documents
        let localCount = Int(localDoc.int(forKey: "count"))
        let remoteCount = Int(remoteDoc.int(forKey: "count"))

        // Track seen entry IDs to avoid duplicates
        var seenEntryIds = Set<String>()
        var mergedCount = 0

        // First add entries from local document, then from remote
        // [Implementation details omitted for brevity]

        return mergedDoc
    }
}
Important learning: My first conflict resolution attempt used a timestamp-based strategy (newer wins), but this caused data loss when two users added entries while disconnected. Always consider edge cases in your conflict resolution strategy.
Building the UI with SwiftUI
With the database and sync functionality in place, I built the UI using SwiftUI following the MVVM (Model-View-ViewModel) architecture pattern. I leveraged the new @Observable macro introduced in iOS 17 to create reactive view models that efficiently update the UI when data changes. Here’s a simplified version of the main view:
struct StoryView: View {
    @StateObject private var viewModel = StoryViewModel()
    @State private var showRandomTwist = false

    var body: some View {
        NavigationView {
            VStack(spacing: 0) {
                // Header with title
                headerView

                // Main story content
                ScrollViewReader { scrollView in
                    ScrollView {
                        VStack(alignment: .leading, spacing: 16) {
                            if viewModel.storyEntries.isEmpty {
                                emptyStoryView
                            } else {
                                continuousStoryView
                            }

                            Spacer().frame(height: 100)
                                .id("scrollBottom")
                        }
                        .padding()
                    }
                    .onChange(of: viewModel.storyEntries.count) { _, _ in
                        withAnimation {
                            scrollView.scrollTo("scrollBottom", anchor: .bottom)
                        }
                    }
                }

                // Story composer
                composerView
            }
            .navigationBarHidden(true)
        }
    }
}
The UI is composed of several main components:
- A header with the app title and navigation controls
- A scrollable story display area
- A composer for adding new entries
- Dialogs for setting the author name and archiving stories
Testing and Debugging
Testing a P2P app presents unique challenges:
-
Multiple devices required: Testing peer-to-peer functionality necessitated using several devices. I utilized a combination of iOS simulators and a physical device to thoroughly validate the synchronization process.
-
Debugging network issues: I added a comprehensive logging system
-
Simulating different scenarios: Disconnect/reconnect, conflicting changes, etc.
Key Challenges and Solutions
Network Permissions
As mentioned earlier, I initially forgot the Bonjour service entries in Info.plist. The app would run but never discover peers. Once I added the correct entries, everything worked smoothly.
Certificate Handling
Loading the certificates properly took some experimentation. The key was to add them to the app bundle and load them at runtime:
Conflict Resolution Logic
As I mentioned, my first attempt at conflict resolution was too simplistic. I learned that merging entries by preserving unique IDs and ordering them by timestamp provided the best user experience.
State Management
Keeping all the UI components in sync with the database state was complex. I found that using a central ViewModel with @Observable macro made this much cleaner.
Conclusion
Building PeerPlot was a fantastic learning experience. The combination of SwiftUI for the interface and Couchbase Lite for offline-first data sync is powerful for collaborative apps. The challenges I encountered mostly revolved around proper configuration and testing rather than limitations of the technology.
If you’re interested in exploring the full implementation, check out the complete source code on GitHub. Feel free to reach out if you have questions about specific implementation details!
]]>